
Documents Management
by Viindoo
| Lines of Code | 7555 |
| Technical name | viin_document |
| License | OPL-1 |
| Website | https://viindoo.com/apps/modules/19.0/viin_document |
| Read description for | v 14.0 v 15.0 v 16.0 v 17.0 v 18.0 |
| Required Apps | Discuss (mail) |
| Included Dependencies | Viindoo Base Multilingual Tracking Token Expiration |
| Extensions | Documents - Sale Spreadsheet Documents Freight & Document Integration Documents - Project Documents - HR Documents - Accounting Documents - MRP Documents - Inventory Documents - Purchase |
Every file, filed where it belongs - without anyone having to file it
Documents Management organizes every file your business handles into access-controlled Workspaces, files new ones in automatically as they arrive on the records that created them, and moves them through a review flow - without a single email attachment.
Documents Management (technical name viin_document) is an Odoo 19.0 app for Odoo Community and Viindoo SaaS.
At a Glance
The facts of Documents Management in one place. Published by Viindoo.
One library, not ten inboxes
Every file lives inside a Workspace with its own access rules, so a Finance folder stays invisible to Sales and a Legal folder stays invisible to everyone but the Legal team. Organize by department, by project, or by whatever structure your business already runs on - nested as many levels deep as you need.
Files show up already filed
Point Documents Management at any Odoo record - a contact, a project, an order, a shipment - and every new attachment on a matching record becomes a properly filed document automatically, with no extra upload step for the person who created it. A one-time backfill catches every file that existed before the rule did.
Work moves without leaving the document
Turn a document's next step into a one-click action: reassign its owner, add a tag, or schedule a follow-up, either by hand or automatically once a condition is met. When a file needs to leave the building, generate a link that expires on a date you choose - no account, no access to anything else in your data.
Key Features
Workspaces
Nested folders with per-team, per-user, or per-group access tiers. Build the exact folder structure your business needs, and decide who can only view, who can edit, and who merely owns what sits inside each one.
Teams
Group the people who need the same access into a named team with a leader and members, then grant a Workspace to the whole team in one step instead of adding people one at a time.
Tags & Tag Categories
Classify documents by more than their folder. Color-coded tags, grouped into categories, keep the search panel fast even when a Workspace holds hundreds of files.
Document Generation Rule
Aim a rule at any Odoo model and every new attachment on a matching record becomes a filed document by itself from then on; run it once manually to backfill every attachment that already existed before the rule was set up. Newly generated documents land in the right folder immediately - tag them the same way you would tag any other document.
Document Actions
One-click or condition-triggered automation that moves a document, reassigns its owner, adds or removes tags, or schedules a follow-up activity. Set it up once, and it runs itself from then on.
Request a Document
Ask a colleague for a file you don't have yet, right from the Documents app. The request is tracked as a scheduled activity with a due date until they deliver it.
Shared Links
Generate an expiring, rotating-token link to a single document or an entire Workspace for someone outside the system. No account, no login, and it stops working on the date you choose.
Document Sidebar & Preview
Open a file, change its owner, tags, or Workspace, preview PDFs, images, and videos, or replace it with a drag-and-drop - all from a side panel, without leaving the kanban view.
How It Works
Build the structure once. An Officer creates a "Marketing" workspace, nests "Campaigns" underneath it, then creates a "Legal Team" with a leader and members and grants that team write access to a Workspace. From here on, the right people see the right folders - and nobody else does.
File a document in seconds. Anyone with access to a Workspace uploads a file straight into it, or registers an external URL as a document instead of a file. Opening the document's side panel adds a tag and sets an owner without ever leaving the kanban.
Ask for a file you don't have. Request a document from a colleague straight from the New menu; the ask becomes a scheduled activity with a due date that stays open until they deliver it.
Let filing happen by itself. An Administrator sets up a Document Generation Rule once - say, on Contacts - so every new attachment on a matching record becomes a filed document from that point on, with a one-time "Run Manual" step to catch every attachment that already existed.
Automate the next step. A Document Action makes a one-click button appear on documents that match a condition - it can move the file, reassign its owner, tag it, or schedule a follow-up, and it's already there before anyone clicks it.
Share it outside the company. Generate a Shared Link with an expiry date directly from the sidebar. The recipient opens it with no login and no access to anything else in the system, and its status shows "Active" until the date it expires.
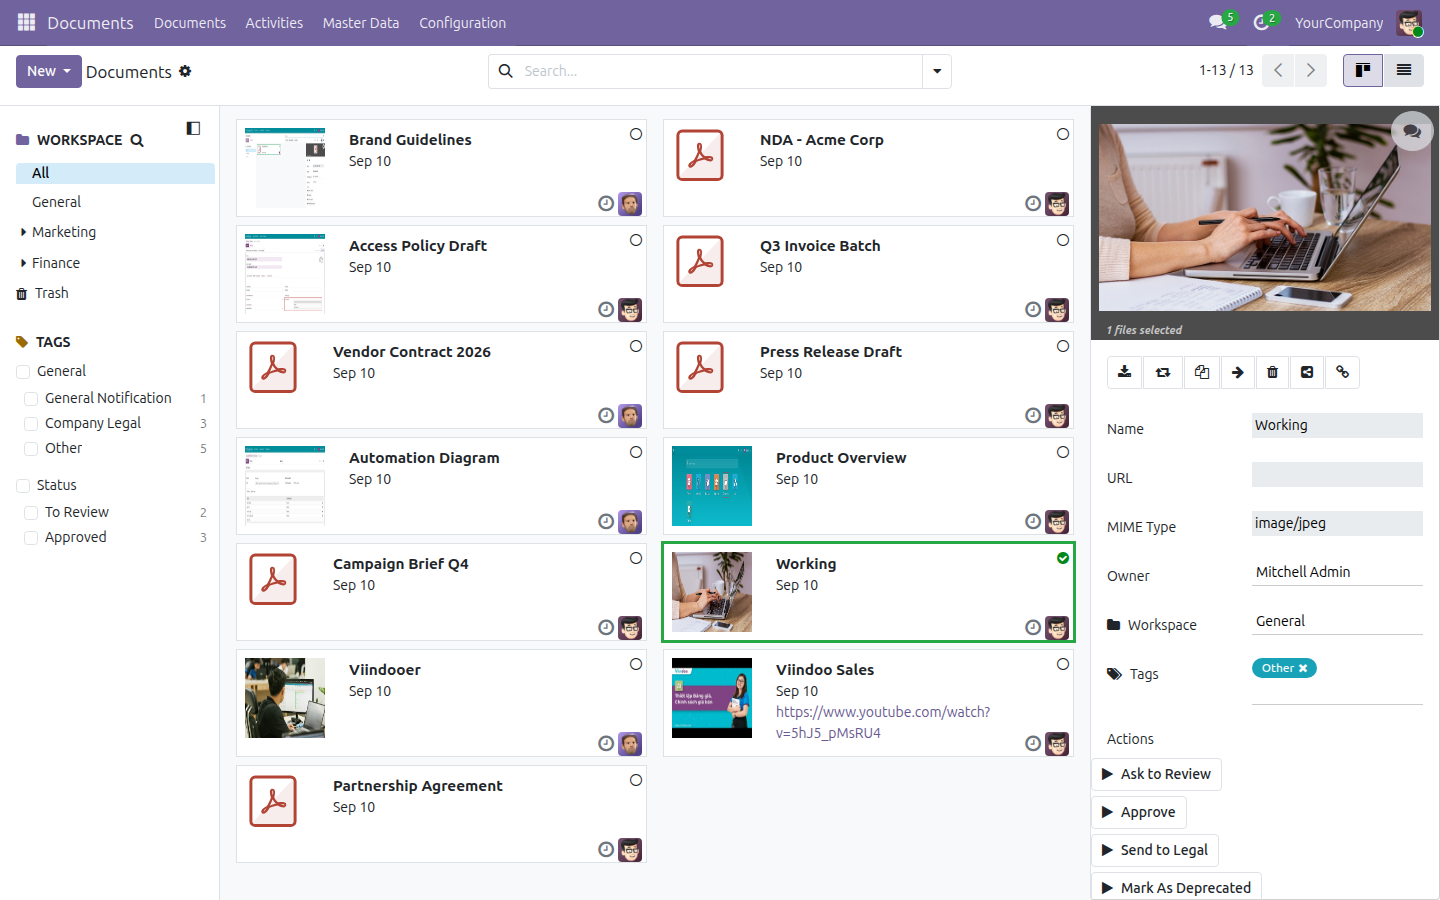
One-click Document Action in the sidebar
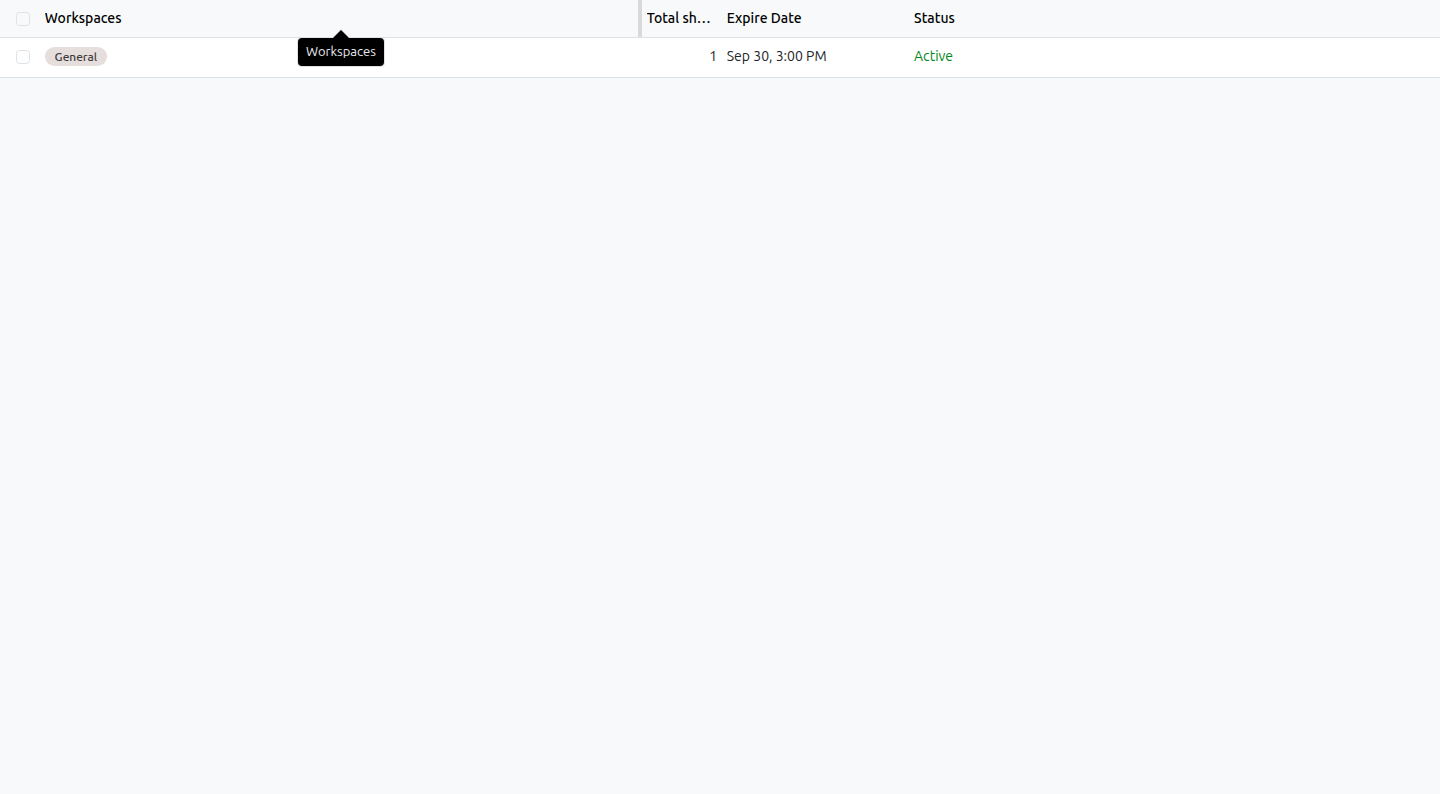
Shared Links, with an Active link status
Nest Workspaces and Grant Team Access
Campaigns nests under Marketing and shows up that way in both the Workspaces list and the Documents folder tree. Its Access Right tab shows exactly who can read or write inside it - a named team and specific users, not everyone.
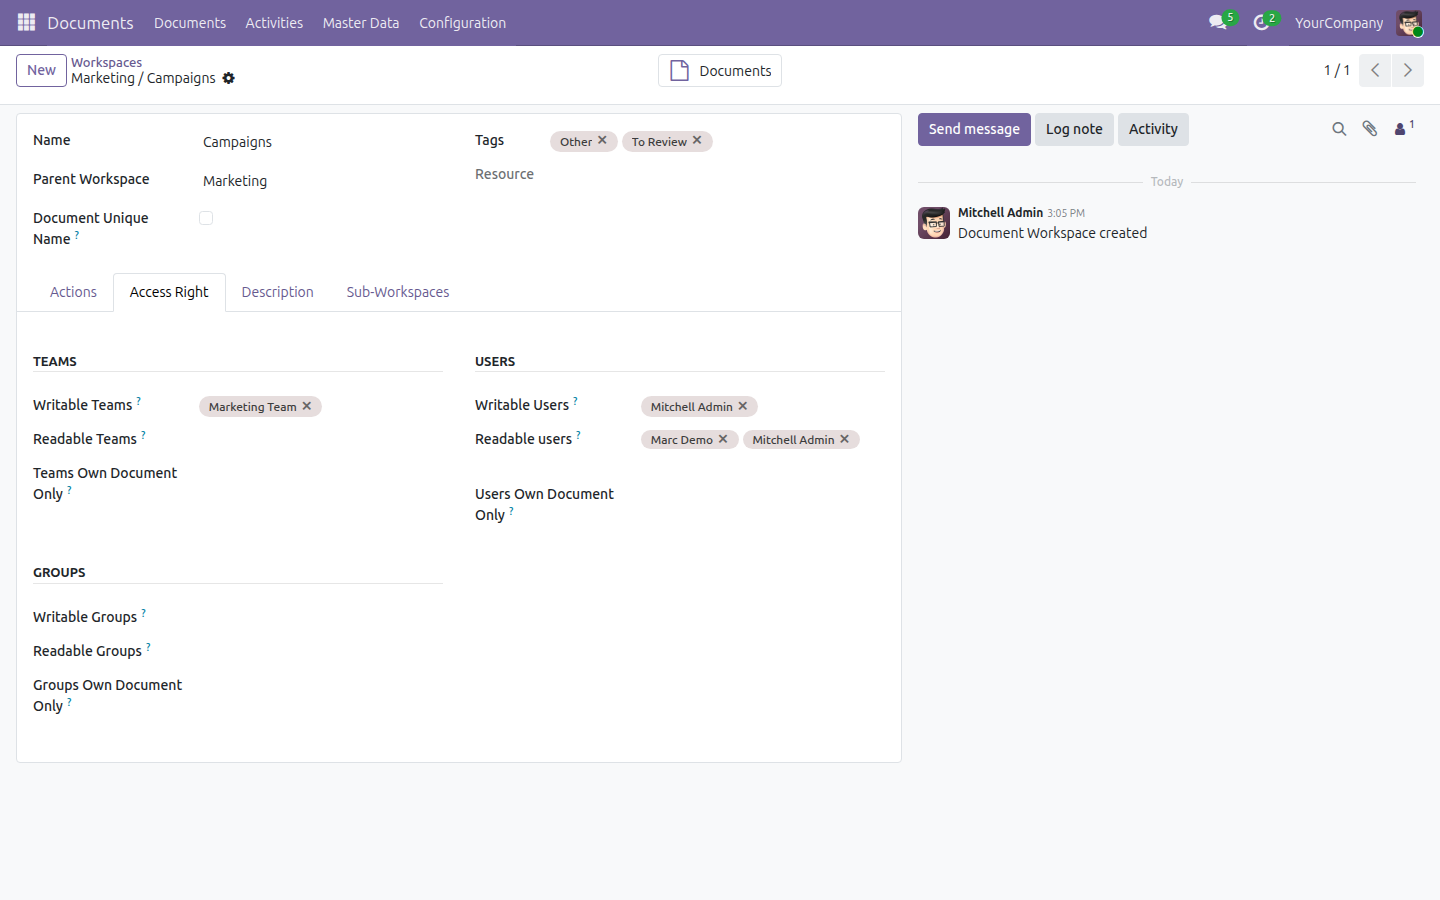
Auto-File Documents From Any Record
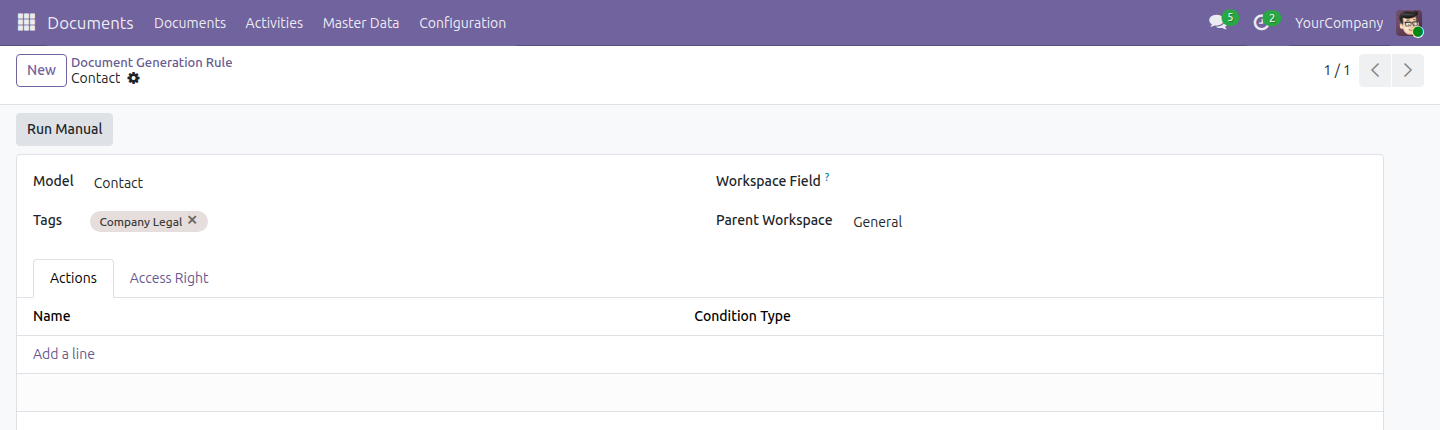
Aim a Document Generation Rule at a model, such as Contacts, and every new attachment on a matching record is filed automatically from then on.
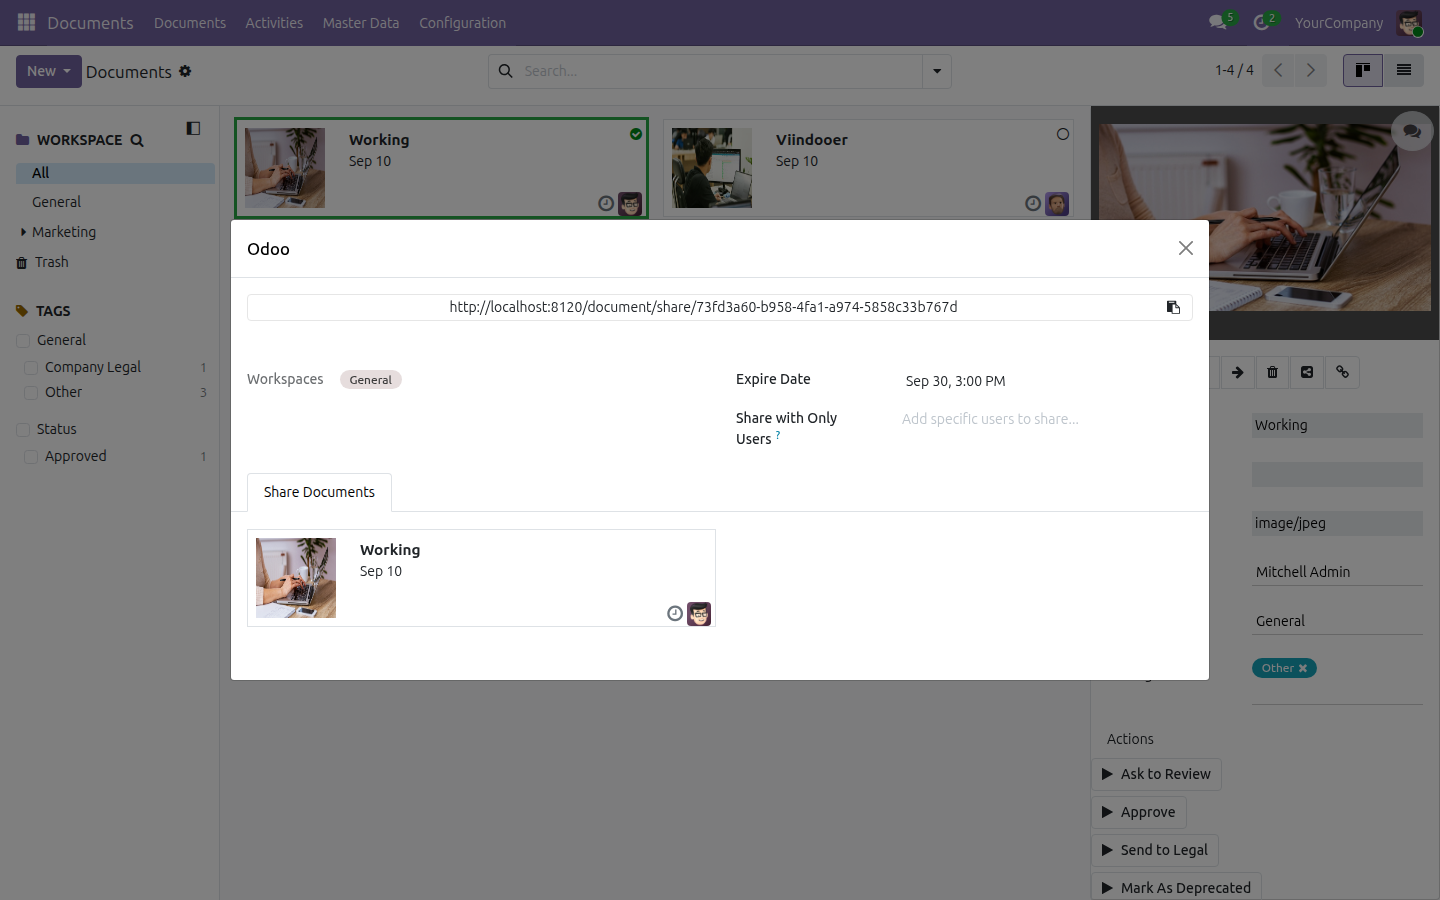
Generate a Secure Sharing Link
Share a document with someone outside the company - no account, no login, and it stops working on the expiry date you choose.
Need help with Documents Management?
Support
apps.support@viindoo.comTechnical Requirement
- Odoo version: 19.0
- Editions: Odoo Community Edition, Viindoo SaaS
- Auto-installed dependencies: Viindoo Mail Tracking, Token Expiration, Attachment Indexation, Portal
- License: OPL-1
Frequently Asked Questions
Which Odoo edition does Documents Management need?
Community Edition or Viindoo SaaS. Nothing in this app depends on Odoo Enterprise or any Enterprise-only feature.
Does it activate itself when I install another Viindoo app?
No. You add Documents Management deliberately from Apps. It does not auto-install alongside anything else.
What does it bring in as dependencies?
A small, automatic set: Viindoo Mail Tracking, Token Expiration, Attachment Indexation, and Portal. You don't add any of these yourself - installing Documents Management installs them for you.
Does everything above work on a brand-new database, or do I need demo data?
Everything above works on a plain install. The default Workspace, tags, and team ship as real starting data, not demo records you would need to remove later.
Does it connect to my other Odoo apps?
Yes. Dedicated bridge modules add a "Documents" button directly onto records in Accounting, HR, Recruitment, Manufacturing, Project, Purchase, Sales, Inventory, and Freight, filing each record's attachments into Documents Management automatically. Install the one that matches how you work alongside this app.
Documents Management
Instruction video: watch on YouTube
Installation
- Open Apps.
- Search for "Documents Management".
- Click Activate.
Installing Documents Management also installs, on your behalf, the apps it depends on: Customer Portal, Attachments List and Document Indexation, Token Expiration, and Multilingual Tracking. You never install these separately. Once installation finishes, Documents appears as its own app.

Configuration
Do the two things below before handing the app to your team - who can touch documents at all, and whether new workspaces refuse duplicate file names by default.
Set what each user can do with documents
- Open Settings ‣ Users & Companies ‣ Users and select a user.
- Open the Access Rights tab.
- Under DOCUMENTS, set the Documents field.
- Click Save.
The Documents field takes one of three values. No means the user cannot open or upload documents at all, unless a workspace, a team, or a group grants them access individually. Officer lets the user access every workspace and upload documents. Administrator gives full access to the app, including Configuration and Master Data.

Enforce unique document names company-wide
By default two documents in the same workspace can share a name. To change that for every workspace created from now on:
- Open Documents ‣ Configuration ‣ Settings.
- Open the Document tab.
- Tick Unique Document Name.
- Click Save.
Every workspace created afterwards has its own Document Unique Name field pre-checked, so uploading a second document with the same name into it is refused. Workspaces that already existed are not changed - open one directly and tick its own Document Unique Name field if you want the same rule there too.

Usage
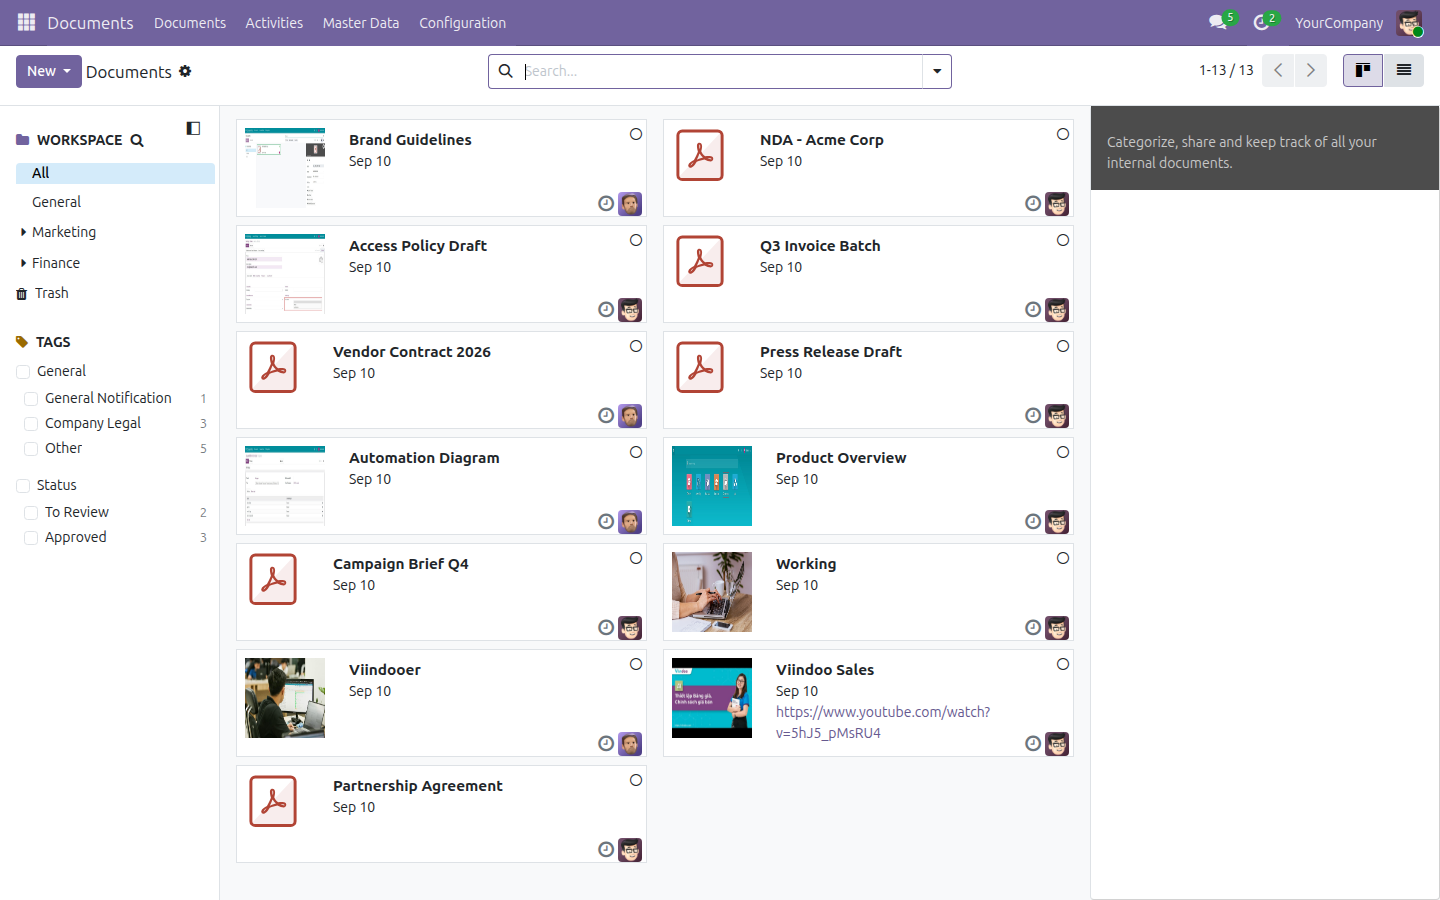
Every document lives inside a workspace - a folder with its own access rules. Open Documents ‣ Documents to see the library: a folder tree on the left, the documents themselves in the middle, and a details panel on the right for whichever document you have open.
Upload a file and tag it
- Open Documents ‣ Documents.
- In the left panel, click the workspace you want to file into (for example General).
- Click New, then Upload.
- Pick the file from your computer. It appears as a new card, owned by you.
- Click the card to open the details panel on the right.
- In the Tags field, pick one or more tags.
A tag you apply here is saved immediately - there is no separate Save step. A tag with a colour assigned also appears as a coloured chip directly on the card, so you can spot it without opening the details panel; a tag left at No color still filters and searches correctly, it just does not show a chip on the card face. Give any tag you want to recognise at a glance a colour when you create it.


Register a link instead of uploading a file
Use this when what you want to keep track of is a URL - a cloud-storage link, an external page - rather than a file.
- Open Documents ‣ Documents and pick a workspace.
- Click New, then Add a Link.
- Fill in Name and URL.
- Click Add A Link.
The link appears as a card with a link icon; clicking it opens the URL in a new tab.


Request a document from a colleague
- Open Documents ‣ Documents and pick a workspace.
- Click New, then Request a Document.
- Fill in Document Name, Request To (the colleague who has the file), and Due Date. Summary is optional context for them.
- Click Request.
A placeholder document appears in the workspace, and the person you asked gets a scheduled activity due on that date. Open Documents ‣ Activities to see every outstanding request across the app in one timeline, including this one.


Build a nested workspace structure
Workspaces can nest as many levels deep as you need - a department, then a project underneath it, for instance.
- Open Documents ‣ Master Data ‣ Workspaces.
- Click New.
- Fill in Name.
- To nest it under another workspace, select that workspace in Parent Workspace.
- Click Save.
The Workspaces list shows every workspace's Parent Workspace, so the whole tree is visible at a glance; the same nesting shows up as an expandable folder tree in the Documents app itself.


Create a team and grant it access to a workspace
A team lets you grant several people access to a workspace in one step instead of adding them one at a time.
- Open Documents ‣ Master Data ‣ Teams.
- Click New.
- Fill in Name and Leader.
- Open the Members tab and add one or more members.
- Click Save.
- Open Documents ‣ Master Data ‣ Workspaces and open the workspace to share.
- Open the Access Right tab.
- Under TEAMS, add your team to Writable Teams (read and upload) or Readable Teams (view only).
- Click Save.
Every member of that team now has the access you granted, without being added to the workspace individually. The same tab also grants access to individual users (under USERS) or to whole Odoo groups (under GROUPS).


Classify documents with tag categories and tags
Tags let you find documents by more than which folder they sit in. Group related tags under a category first, then create tags inside it.
- Open Documents ‣ Master Data ‣ Tag Categories, click New, fill in Name, and click Save.
- Open Documents ‣ Master Data ‣ Tags and click New.
- Fill in Name, select the Category you just created, and pick a Color Index.
- Click Save.
Give the tag a colour if you want it to show as a chip on the document card - a tag left at No color still works for search and filtering, it just will not appear on the card itself. Apply the tag to a document the same way as any other tag, from its details panel.


Automate what happens to a document with Actions
An Action turns a repeated next step - reassign the owner, add a tag, move the document - into a one-click button that appears on any document matching a condition you set.
- Open Documents ‣ Configuration ‣ Actions.
- Click New and fill in Name.
- Under Included Tags, pick the tag (or tags) a document must carry for this Action to appear on it. Use Excluded Tags the same way to keep it off documents that carry a tag you name there.
- Open the Action tab and set what running it does: Set Owner reassigns the document, Move to Workspace files it elsewhere, and the SET TAGS list adds, removes, or replaces tags.
- Click Save.
From then on, any document whose tags match your condition shows this Action as a button in its details panel - before anyone even clicks it. Clicking the button runs every effect you configured in one step, without leaving the kanban.


Auto-file attachments from another record
Point a Document Generation Rule at any Odoo model - Contacts, for instance - and every file attached to a matching record is filed into Documents automatically from then on, with no extra upload step for whoever attaches it.
- Open Documents ‣ Configuration ‣ Document Generation Rule.
- Click New.
- Select the Model whose attachments you want filed (for example Contact).
- Select a Parent Workspace for the documents this rule creates.
- Click Save.
- Click Run Manual in the header. A wizard opens - click its own Run Manual button to file every attachment that already existed on a matching record before the rule did.
A rule you create keeps working after this one-time backfill: every new attachment on a matching record from now on is filed the same way automatically. A document filed this way arrives without any tag - tag it yourself from its details panel the same way you would tag any other document.

Copy or move a document to a different workspace
- Open Documents ‣ Documents and click the document's card to select it.
- In the details panel's icon row, click Copy to... to duplicate it into another workspace and keep the original where it is, or Move to... to relocate the original itself.
- Select the destination Workspace.
- Click Copy or Move.
A copy keeps its own tags and owner; a move only changes which workspace the document sits in - nothing else about it changes.


Share a document with a public link
- Open Documents ‣ Documents and click the document's card to select it.
- In the details panel's icon row, click Share.
- Set an Expire Date. Optionally restrict the link to specific people under Share with Only Users.
- Click Generate URL.
- Click the copy icon next to the link to copy it to your clipboard.
Anyone who opens the link can view and download the document with no login and no access to anything else in the system, until the expiry date passes. Every link you generate is listed under Documents ‣ Configuration ‣ Shared Links, with its Status shown as Active (in green) until it expires.
Creating a share needs either the Administrator access right, or real write access - granted individually, through a team, or through a group - on every workspace the shared documents belong to.


Troubleshooting
A tag does not show on a document card. Open the document's details panel and check its Tags field - the tag is very likely applied correctly. A tag only appears as a chip on the card face when it has a colour assigned; a tag left at No color still filters and searches correctly, it just stays invisible on the card itself. Open the tag under Tags and give it a colour.
A document that was filed automatically has no tags. This is expected. A Document Generation Rule files the document and puts it in the right workspace, but it never applies a tag by itself. Open the document's details panel and add the tag you want.
Master Data or Configuration is missing from the top menu. Those menus need the Officer or Administrator Documents access right. Ask an Administrator to raise your access right under Settings.
The Share button on a document does nothing, or refuses to work. Sharing needs either the Administrator access right, or real write access on every workspace the shared documents sit in. Officer access alone is not enough if you are not also granted write access on those specific workspaces.
An Action I configured never shows up on a document. Check the Action's Included Tags and Excluded Tags - the document must carry every included tag and none of the excluded ones. A newly filed document (uploaded, or auto-filed by a Document Generation Rule) carries no tags until you add one, so an Action gated on a tag never appears on it until then.
FAQ
Who can see a workspace by default? Only the people, teams, or groups granted access on that workspace's Access Right tab, plus anyone with the Administrator access right. A brand-new workspace starts with no one granted beyond its creator until you open that tab and add access.
Do I need Odoo Enterprise to use this app? No. Documents Management runs on Odoo Community and on Viindoo SaaS; nothing in it depends on an Enterprise-only feature.
Where do I manage Teams? I remember them being under Configuration. Teams live under Documents ‣ Master Data ‣ Teams, not Configuration.
Can I undo a move? Yes - open the document and use Move to... again to send it back to its previous workspace. A move only ever changes which workspace a document sits in.
What happens once a shared link expires? The link stops working; anyone who opens it after the Expire Date no longer reaches the document. The row stays listed under Shared Links, with its Status now showing as Expired.
Does deleting a tag remove it from documents that carry it? Yes - a tag you delete from Tags is removed from every document that had it applied. Documents themselves are never deleted by deleting a tag.
This software and associated files (the "Software") may only be used (executed, modified, executed after modifications) if you have purchased a valid license from the authors, typically via Odoo Apps, or if you have received a written agreement from the authors of the Software (see the COPYRIGHT file).
You may develop Odoo modules that use the Software as a library (typically by depending on it, importing it and using its resources), but without copying any source code or material from the Software. You may distribute those modules under the license of your choice, provided that this license is compatible with the terms of the Odoo Proprietary License (For example: LGPL, MIT, or proprietary licenses similar to this one).
It is forbidden to publish, distribute, sublicense, or sell copies of the Software or modified copies of the Software.
The above copyright notice and this permission notice must be included in all copies or substantial portions of the Software.
THE SOFTWARE IS PROVIDED "AS IS", WITHOUT WARRANTY OF ANY KIND, EXPRESS OR IMPLIED, INCLUDING BUT NOT LIMITED TO THE WARRANTIES OF MERCHANTABILITY, FITNESS FOR A PARTICULAR PURPOSE AND NONINFRINGEMENT. IN NO EVENT SHALL THE AUTHORS OR COPYRIGHT HOLDERS BE LIABLE FOR ANY CLAIM, DAMAGES OR OTHER LIABILITY, WHETHER IN AN ACTION OF CONTRACT, TORT OR OTHERWISE, ARISING FROM, OUT OF OR IN CONNECTION WITH THE SOFTWARE OR THE USE OR OTHER DEALINGS IN THE SOFTWARE.