
Stock Barcode
| Lines of Code | 4059 |
| Technical name | viin_stock_barcode |
| License | OPL-1 |
| Website | https://viindoo.com/apps/modules/18.0/viin_stock_barcode |
| Read description for | v 10.0 v 11.0 v 12.0 v 13.0 v 14.0 v 15.0 v 16.0 v 17.0 |
| Required Apps | Discuss (mail) Inventory (stock) |
| Extensions | MRP Barcode |

Receive, deliver, move, count and scrap goods by scanning - on the phone already in your pocket
For warehouse teams that move goods every day
Add barcode scanning to Inventory operations and stock counts.
Is this you?
Pick lists and receipts are printed, then typed into the system later.
Product, lot and location codes are keyed by hand, and typos show up only when stock stops matching.
Counts are written on paper and entered afterwards by one person.
Workers walk back to a desk to press Validate or Cancel.
Scanners and special devices feel like a big purchase before you know the app fits.
What changes
Typing codes by hand
→ Scan the transfer, then products, lots, packages and locations; the screen fills itself.
Paper lists
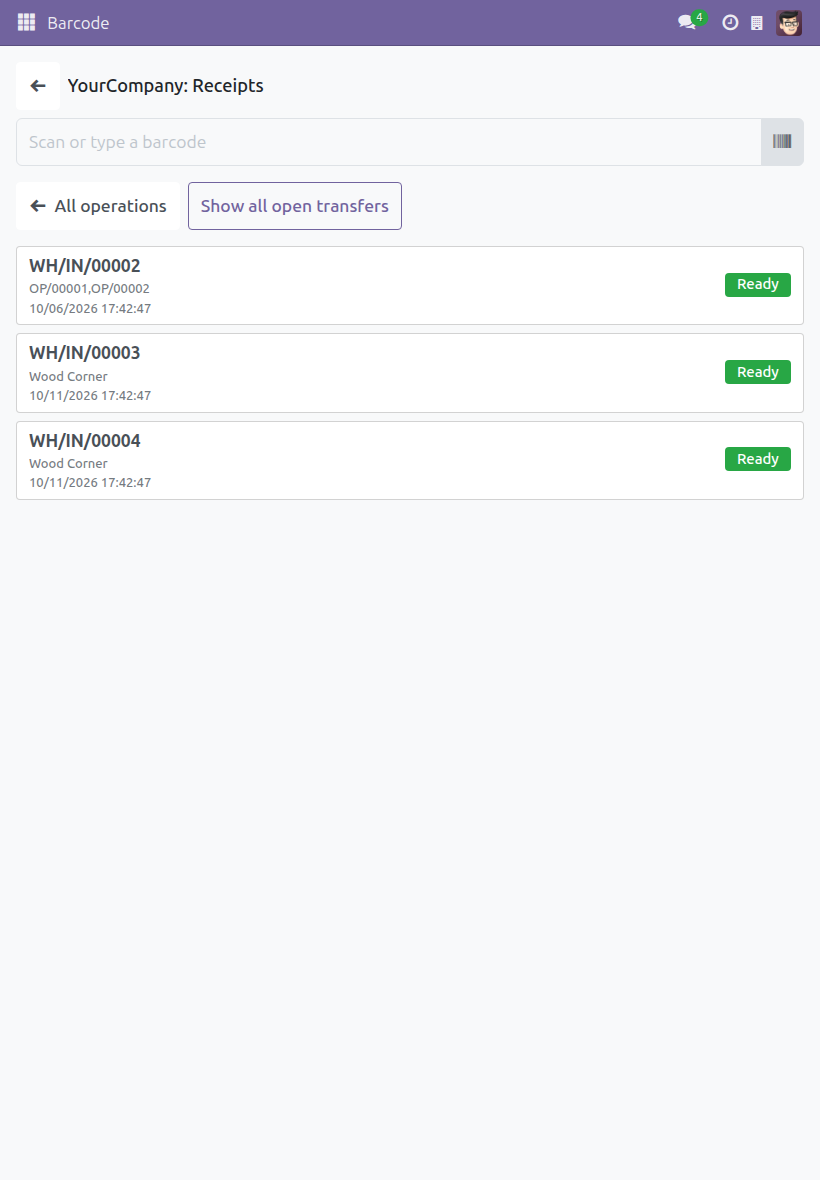
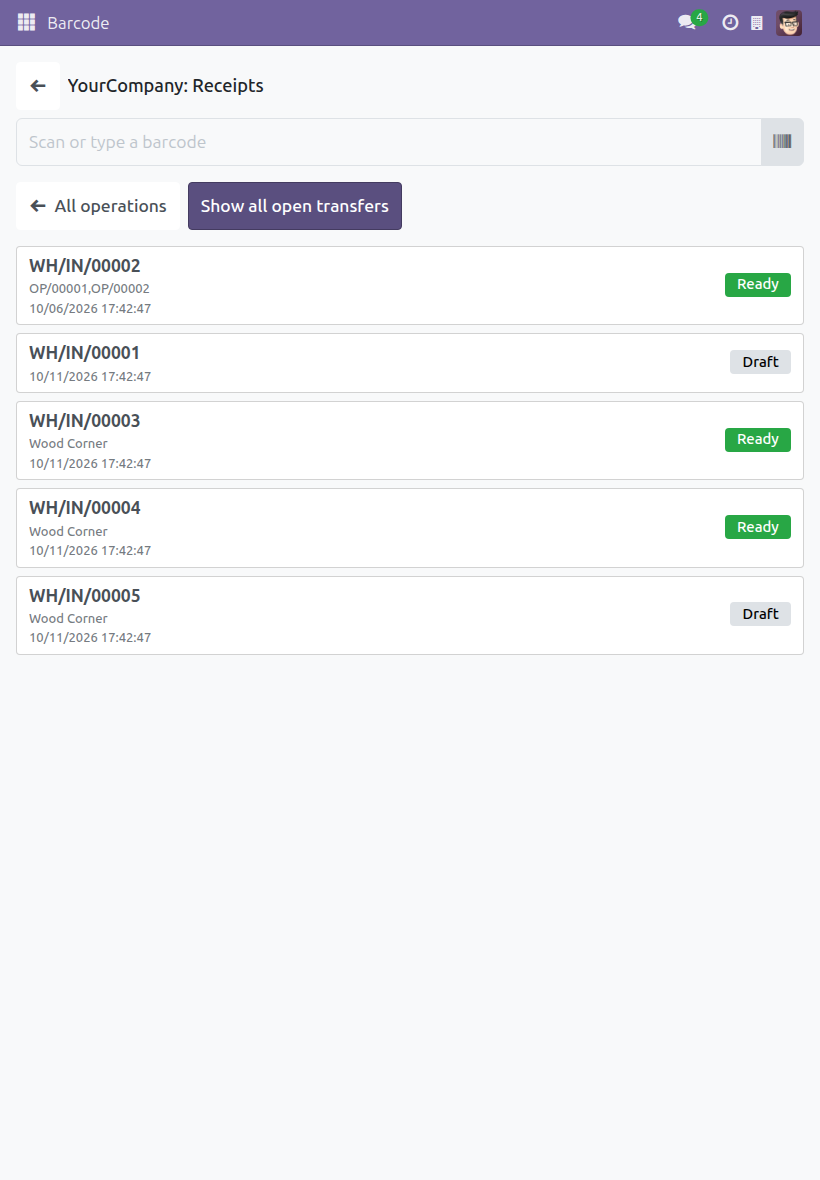
→ Open Operations and see the transfers that are Ready; one toggle shows every open transfer.
Counts that disagree
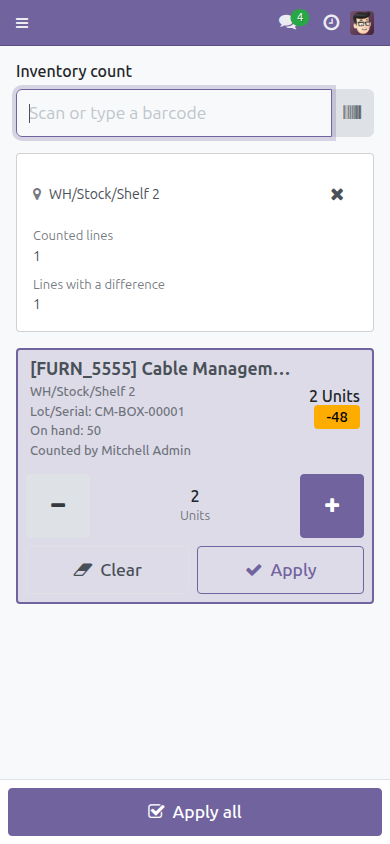
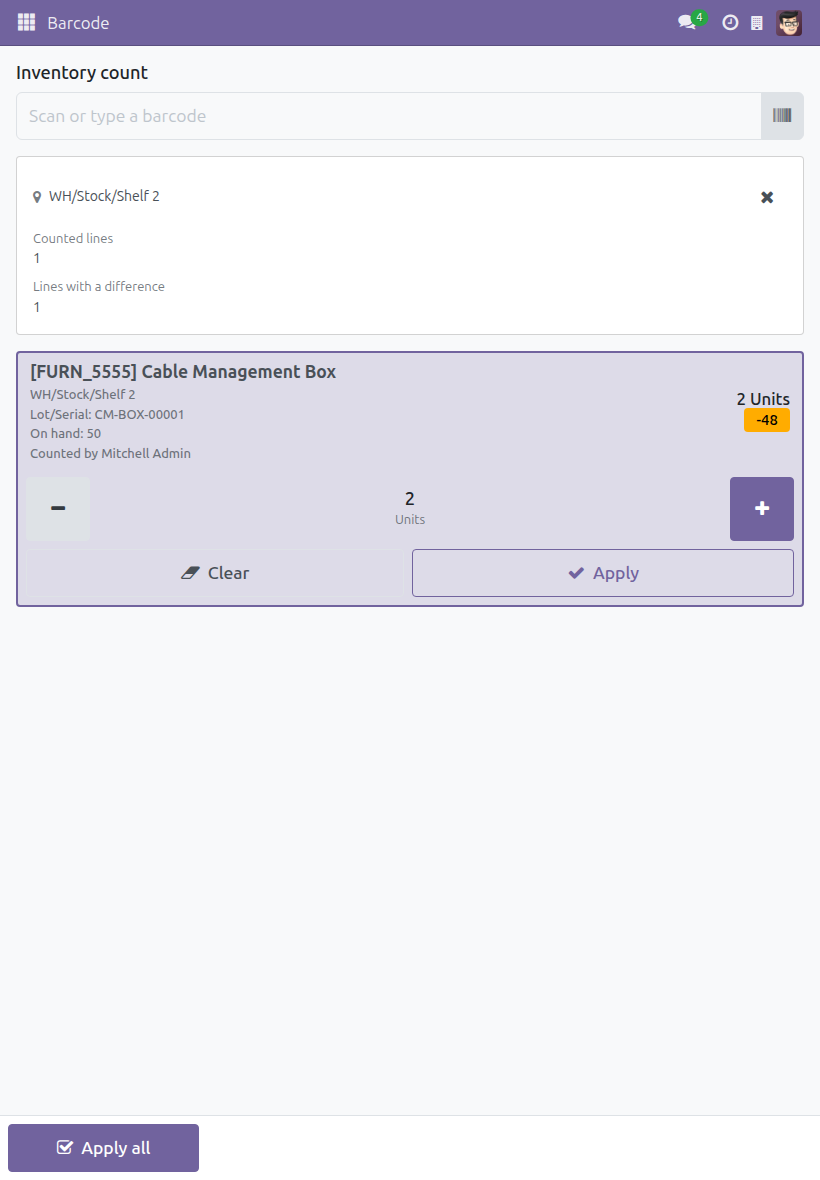
→ Scan a location, count what is on the shelf, then Apply all for that location only.
Walking to the desk
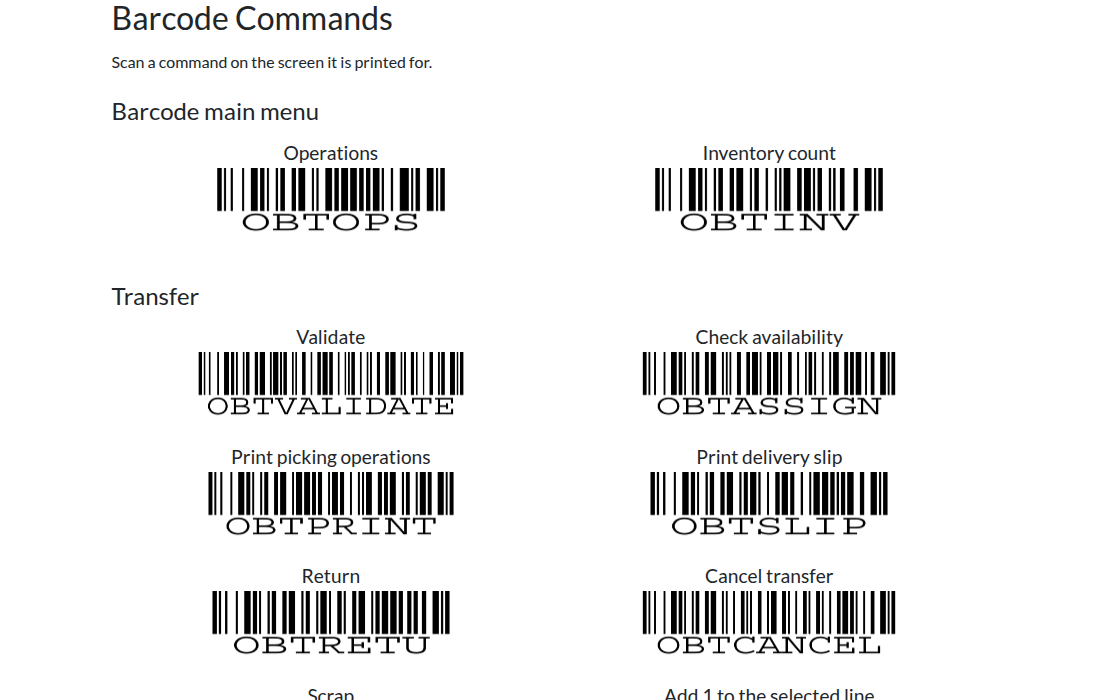
→ The main actions of each screen have a printable command barcode: Validate, Cancel, +/-, Apply, Confirm.
Hardware doubts
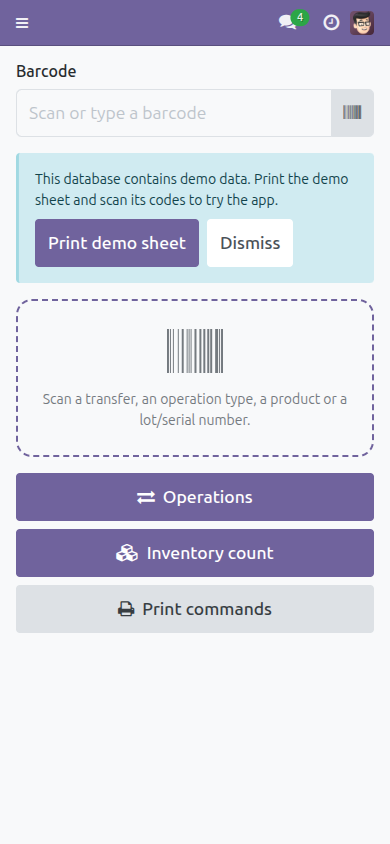
→ The phone camera reads codes where a camera is available; manual entry and hardware scanners work too.
How it works
Draft and Waiting
The Warehouse Operator checks availability on the transfer.
Ready
The Warehouse Operator scans products, lots and locations and presses Validate (or scans the Validate command).
Done
The transfer is posted; a Return can be started from the Done transfer.
Counts and scrap follow the same pattern: scan the location, scan the product, apply. The Warehouse Manager sets barcodes on operation types, locations and products once.
Key Features
Transfer by scan
Receive, deliver or move goods on a phone: scan products, lots/serials, packages and locations, adjust quantities with +/- and Validate.
Inventory Count
Count stock location by location: scan a location, then products, lots or packages; apply one count or all counts.
Scrap by scan
On the Scrap form, scanning a product, lot/serial, location or package fills the form and shows a warning when nothing matches.
Barcode Commands sheet
A printable A4 sheet of command barcodes so the main actions of each screen can be pressed by scanning.
GS1 and aggregate labels
Scans are decomposed by the company barcode nomenclature, classic or GS1; unreadable labels give a message instead of an error.
Camera scanning
Use the phone camera to read a barcode when available, or type a code manually.
Who it is for
Owner or operations director
Fewer stock mistakes and faster receiving and delivery, with no new hardware to buy.
Warehouse Manager
Counts and transfers that update stock as workers scan; barcodes on operation types and locations are set once.
Warehouse Operator
Scan instead of type; the main actions are reachable from the phone or a printed command.
System Administrator
A small add-on to Inventory using standard Inventory access rights; users without access see a clear notice.
Best for: warehouse teams that receive, deliver, move, count and scrap goods and want each task done by scanning on a phone or scanner.
Receive goods by scanning
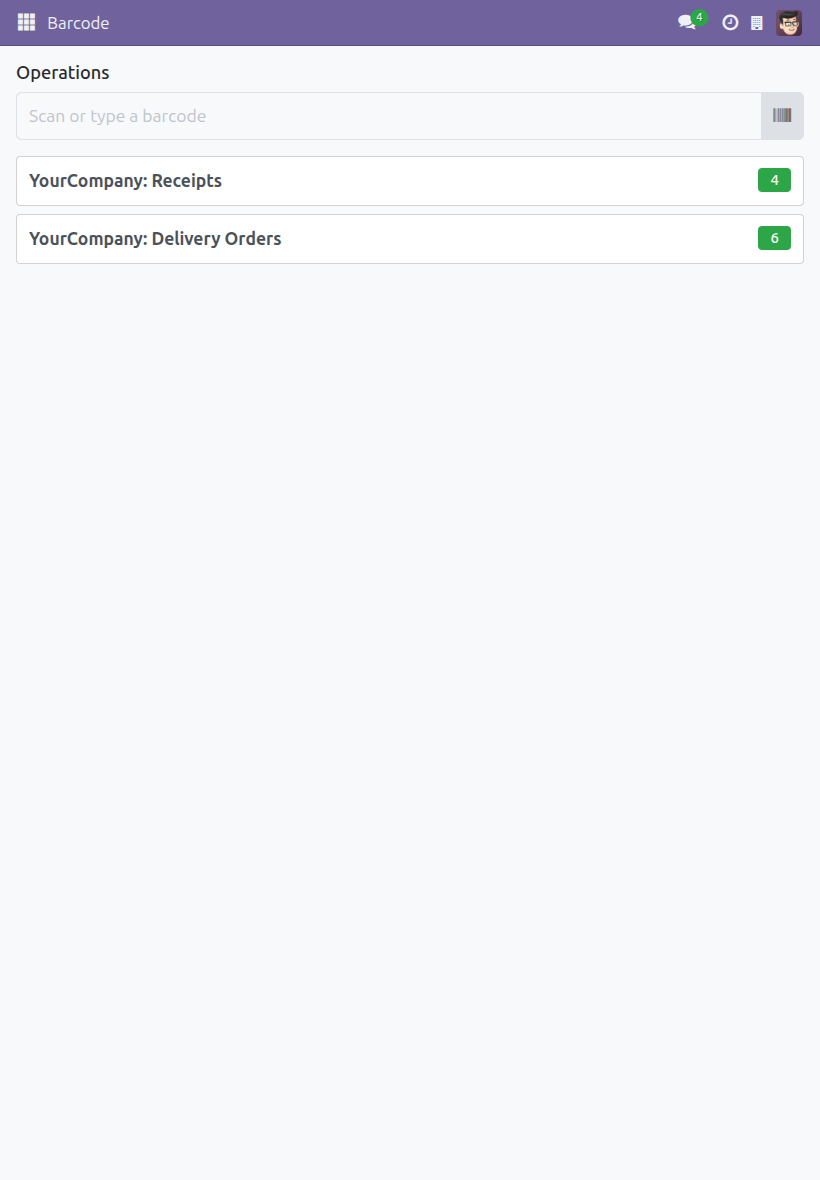
Pick an operation type
See the transfers that are Ready
See every open transfer at once
Count stock location by location
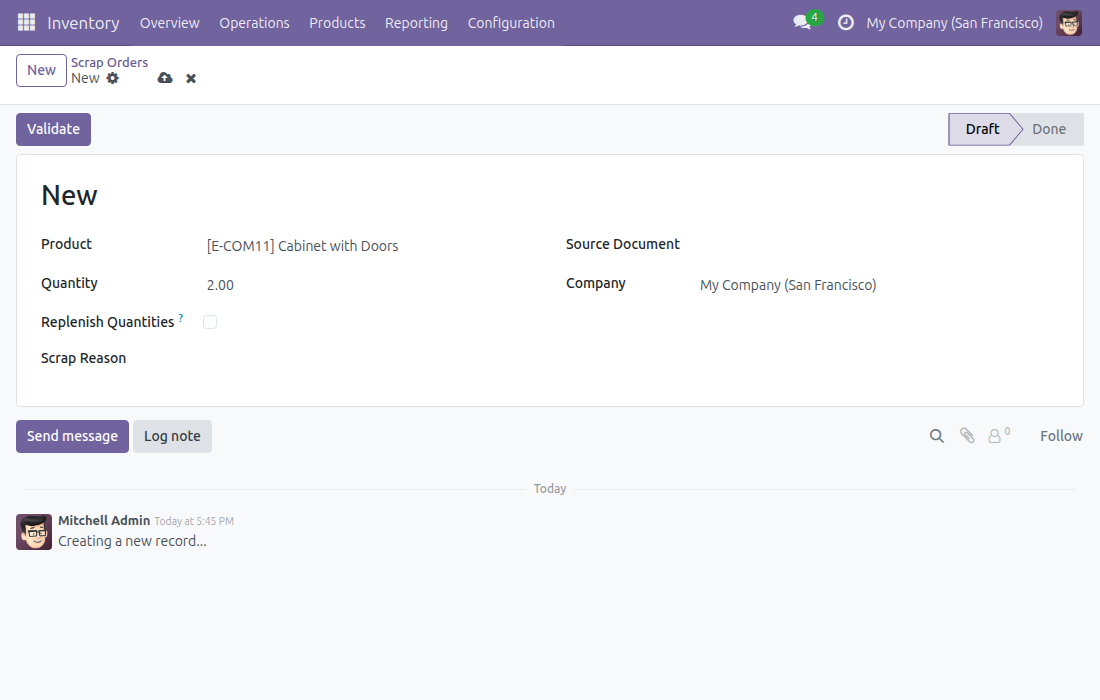
Scrap by scanning
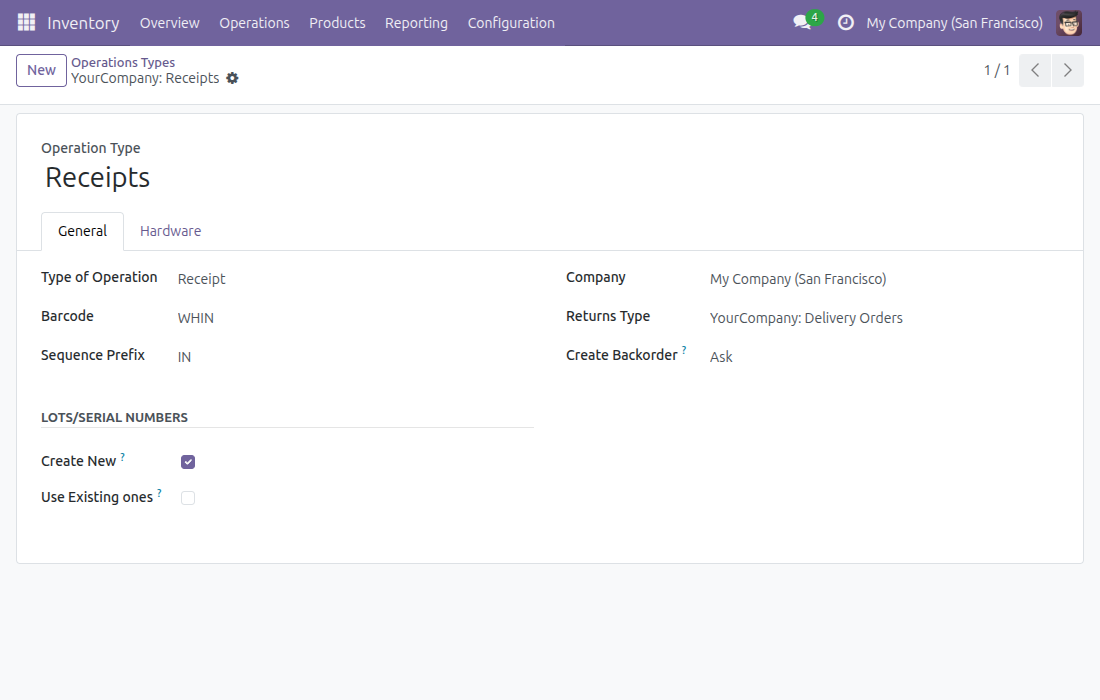
Give each operation type a barcode
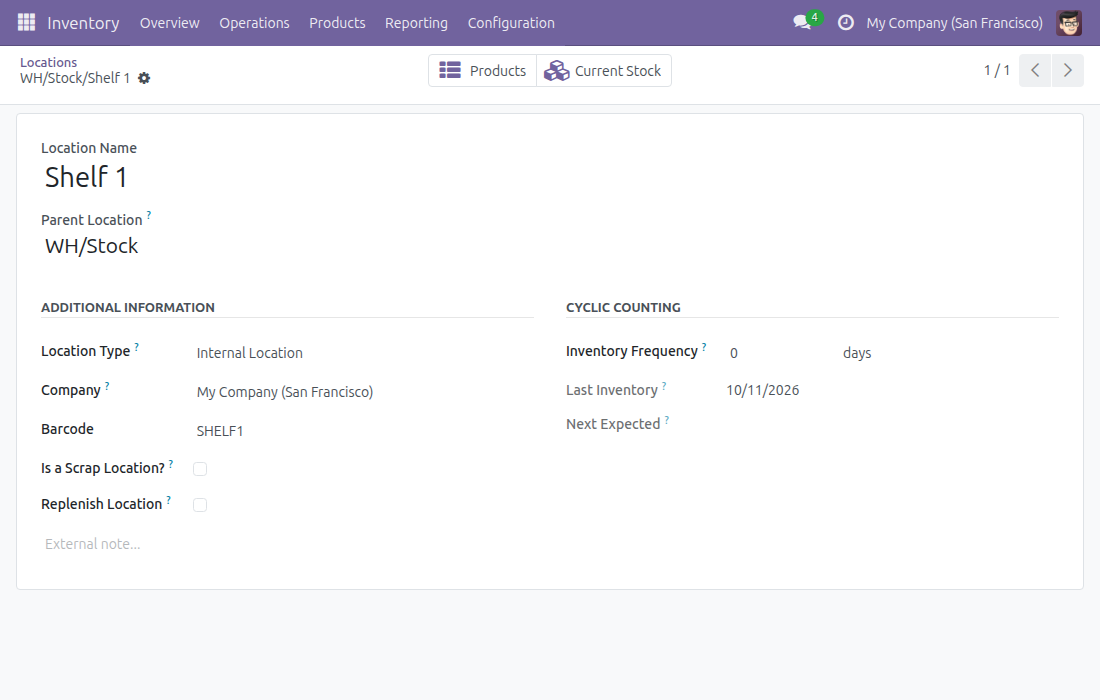
Give each location a barcode
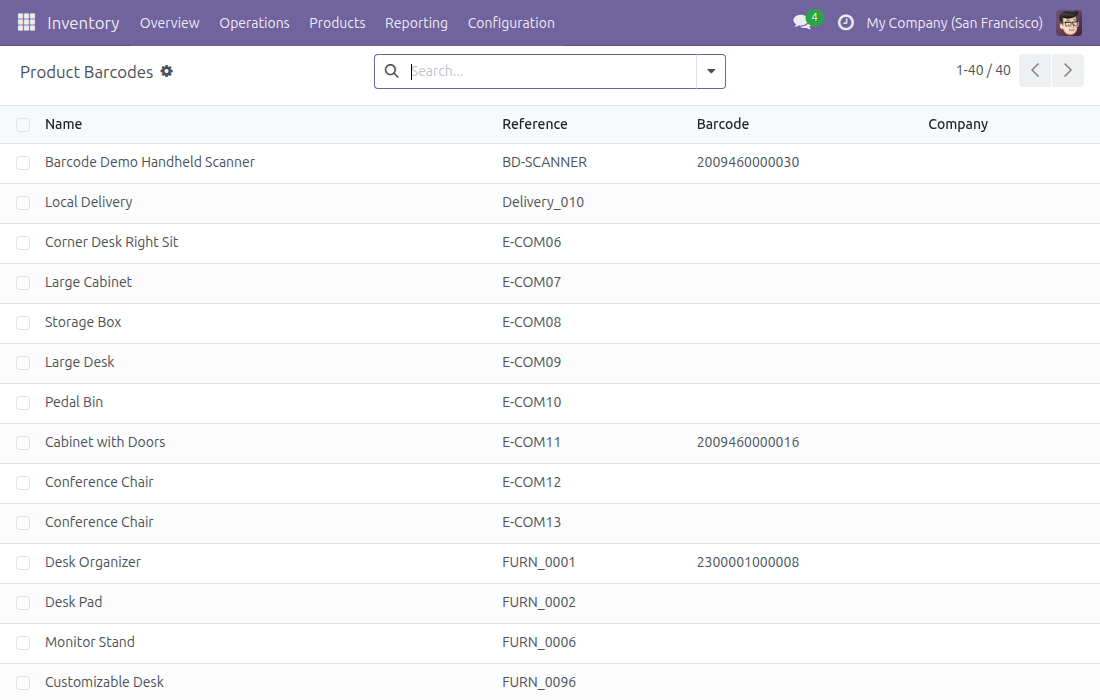
Edit product barcodes in one list
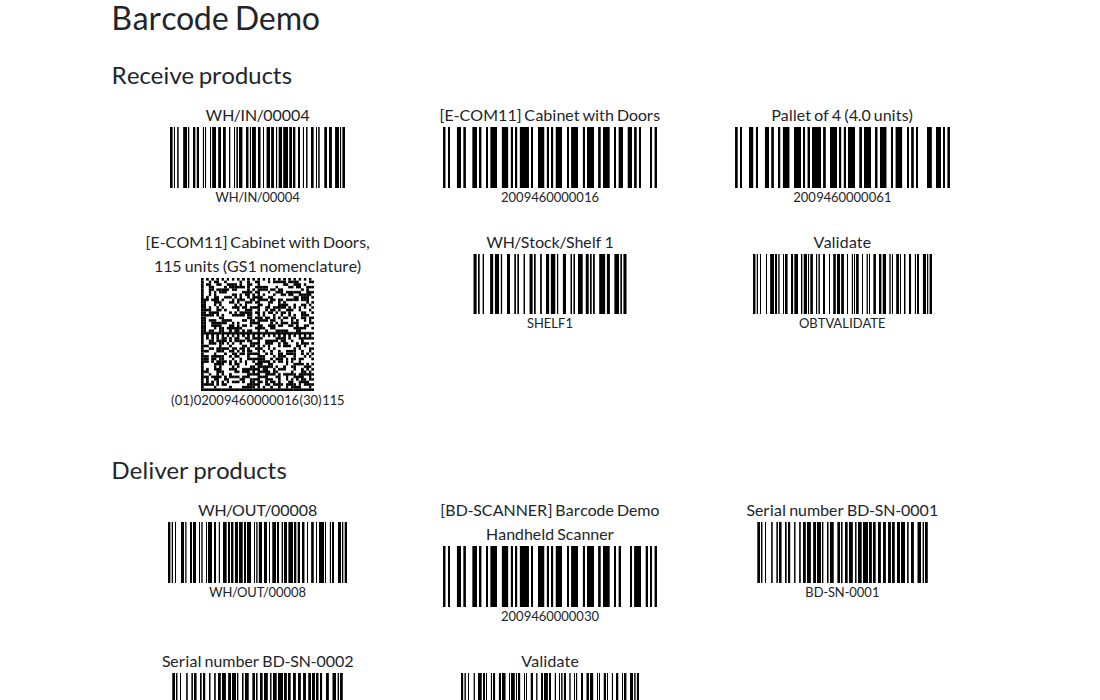
Try it with the printable demo sheet
See Stock Barcode in Action
/apps/modules/18.0/viin_stock_barcode
v18demo-int.viindoo.com
Frequently Asked Questions
Do we need to buy scanners?
No. A phone with a browser is enough. Where the phone has a camera, it reads the codes; you can also type a code or use a hardware scanner.
Does it read GS1 labels?
Yes. Scans are decomposed by the company barcode nomenclature, GS1 included. A label is accepted whole or not at all, so a half-read label never fills a line. Weight labels follow the unit-of-measure precision configured on your site.
Who can see which counts?
Stock users see their own counts; the Warehouse Manager reviews every count. Users without Inventory access see a notice instead of a broken screen.
How do I try it before rolling out?
On a demo database, the Barcode app offers a printable demo sheet with products, locations, a GS1 weight label and sample transfers.
Can every button be pressed by scanning?
Not every button, but the main actions of each screen: Operations, Inventory count, Validate, Cancel, +/-, Apply, Confirm, Save or Discard. Print the command sheet (OBT/OCD codes) and scan the code of the action. Navigation buttons such as Back, Show all or Load more, and line selection, are tapped.
Scanning for manufacturing orders?
See viin_mrp_barcode, the barcode shop floor for manufacturing orders.
Need help with Stock Barcode?
Pre-Sales & Partnership
sales@viindoo.comTechnical Support
apps.support@viindoo.comTechnical Requirement
- Odoo version: 18.0
- Editions: Odoo Community. Not supported on Odoo Enterprise.
- Required modules: Barcodes (barcodes), GS1 Barcode Nomenclature (barcodes_gs1_nomenclature), Inventory (stock)
- License: OPL-1
Stock Barcode
Overview
Stock Barcode lets warehouse staff run their daily work from a phone, a tablet or a handheld scanner: receive goods, deliver them, move them between locations, count the stock and scrap damaged items by scanning barcodes instead of typing. The screens are large, touch-friendly and built for a phone held in one hand.
Editions: Community Edition. Not supported on Odoo Enterprise.
The work of a transfer passes through these stages:
- Draft - the transfer is created, for example by scanning the barcode of an operation type. Acted on by the Warehouse Operator, who checks availability.
- Waiting - the goods are not all available yet. Acted on by the Warehouse Operator, who checks availability again.
- Ready - every product can be picked. Acted on by the Warehouse Operator, who scans the products and validates the transfer.
- Done - the stock is moved. The record is finished and stays with the Warehouse Operator for a possible return.
Who uses this module
| Role | What they do | Access right to assign |
|---|---|---|
| System Administrator | Installs the app and gives each warehouse person the Inventory access right. | Administration / Settings |
| Warehouse Operator | Receives, delivers, moves, counts and scraps goods with a phone or scanner. | Inventory / User |
| Warehouse Manager | Sets barcodes on operation types, locations and products, and reviews every count. | Inventory / Administrator |
A person without any Inventory access right who opens the Barcode app sees a notice asking them to contact their administrator.
Setup (for the System Administrator)
Installation
- Open Apps.
- Remove the default filter and search for Stock Barcode.
- Click Install. The Inventory app is installed with it if it is not installed yet.
After the installation a Barcode app appears on the home menu of every user with the Inventory / User access right.
Configuration
- Open Inventory ‣ Configuration ‣ Settings and turn on the options your warehouse needs: Lots & Serial Numbers (to scan lot and serial numbers), Storage Locations (to scan locations) and Packages (to use Put in pack).
- Make sure the units of measure of weighed products carry the number of decimals you want to see. Quantities read from a weight label follow this precision (see GS1 labels below).
- If your company labels its goods with GS1 barcodes, ask your implementation partner to select the GS1 barcode nomenclature for your company. Without it, labels are read as plain barcodes.
- Ask the Warehouse Manager to fill in the barcodes (see the Warehouse Manager chapter).
Assigning access rights
- Open Settings ‣ Users & Companies ‣ Users and open the user.
- In the Inventory line of the access rights, select User for warehouse operators or Administrator for warehouse managers.
- Click Save.
Warehouse Operator: receives, delivers, moves, counts and scraps goods
Open the Barcode home screen
- Tap the Barcode app on the home menu.
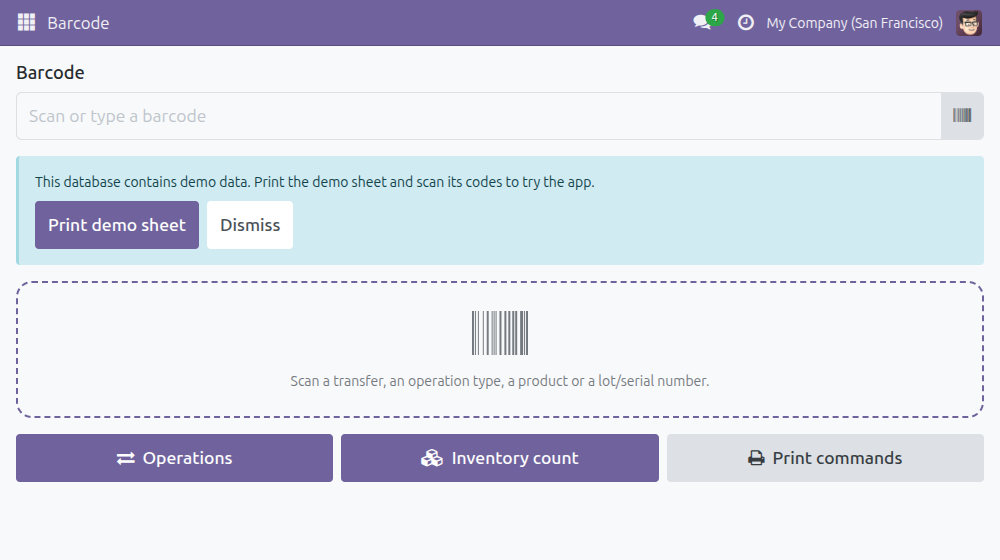
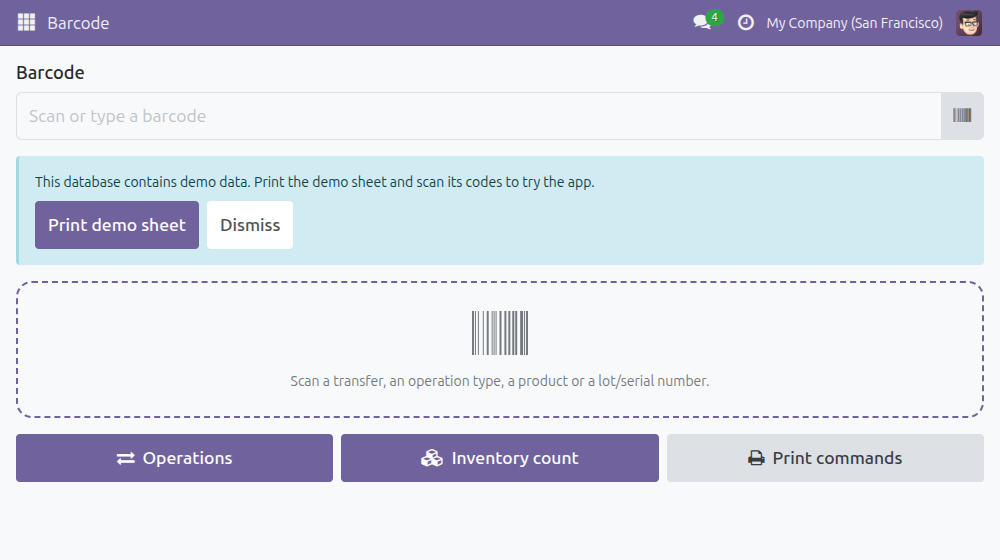
- The home screen shows a box to scan or type a barcode and three buttons: Operations, Inventory count and Print commands.
- Scan a transfer name to open that transfer, scan the barcode of an operation type to create a transfer of that type, or scan a product or a lot/serial number to see its stock on hand.

On a tablet the same screen uses the extra width.

Note
On a demo database a blue banner offers Print demo sheet, a sheet of ready-made barcodes to try the app. Click Dismiss to hide the banner on your device.
Find the transfer to work on
- On the home screen, tap Operations.
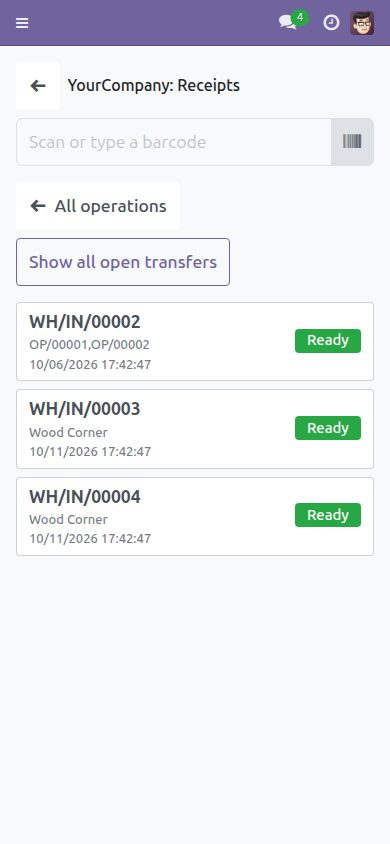
- Tap an operation type, for example Receipts. The number on its card is how many transfers are ready.
- The list shows only the transfers that are Ready, oldest scheduled date first.
- To see the transfers that are not ready yet, tap Show all open transfers. The list then also contains the Draft and Waiting transfers; transfers that are done or cancelled never appear. Tap the button again to go back.
- When the list is long, tap Load more. Tap All operations to return to the operation types.
- Tap a transfer to open it.


Receive goods by scanning
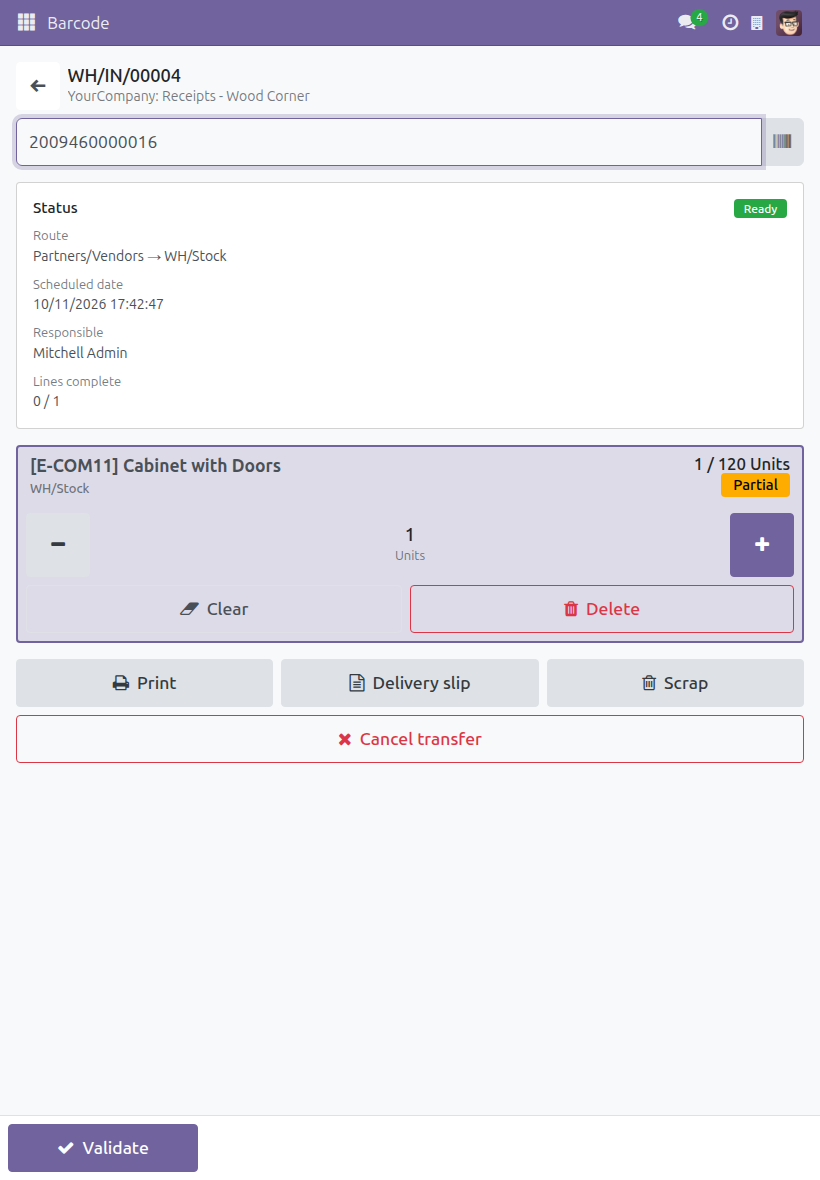
- Open the receipt, either from Operations or by scanning its name.
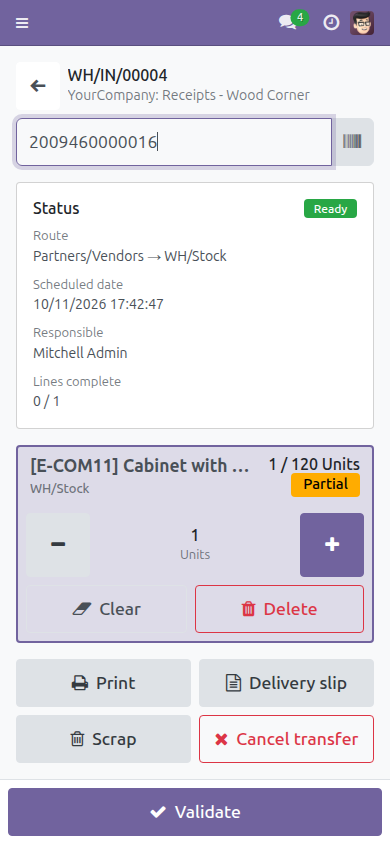
- Scan the barcode of each product. Each scan adds one unit to that product line and the line shows the scanned quantity against the expected one, for example 1 / 120 Units. A line that is partly scanned shows Partial and a line not yet scanned shows To scan. The Lines complete counter in the status box tells how many lines are done.
- To correct a quantity, tap the line, then use - and +, Clear to put the line back to zero, or Delete to remove it.
- If the product is tracked by serial number, scan one unit at a time with its serial number. The same serial number cannot be scanned twice on one transfer. For a lot, scan the lot number together with the product. If the operation type does not create lots, only existing lot numbers are accepted.
- If a product has a packaging, scan the barcode of the packaging to add its whole quantity.
- Scan the barcode of a location to receive the next products there.
- Use Previous line and Next line to move between lines.
- When every line is done, tap Validate. If the system asks a question, for example whether to create a backorder, answer it on screen.

On a tablet the transfer status is shown next to the lines.

Deliver goods by scanning
- Open Operations, tap Delivery Orders and open the delivery.
- If the delivery is not Ready, tap Check availability.
- Scan the products to pick, with their serial or lot number when they are tracked. For a tracked product the number scanned is the one that leaves your warehouse.
- Tap Delivery slip to print the slip, then Validate.
Move goods inside the warehouse
Internal transfers work like receipts and deliveries.
- Open Operations and tap the internal operation type (it appears when your warehouse uses internal transfers).
- Open the transfer, scan the source or destination location when you need to, scan the products, then tap Validate.
Create a transfer by scanning
- On the Barcode home screen, scan the barcode of the operation type, for example the Receipts barcode.
- A new transfer of that type opens. Scan the products to add them, then tap Validate.
Other actions on a transfer
Below the lines of a transfer you find the actions of the transfer:
- Check availability - reserves the stock of a transfer that is not ready.
- Put in pack - puts the scanned lines in a package (when the Packages option is on).
- Print and Delivery slip - print the transfer or the delivery slip.
- Return - on a done transfer, creates a return.
- Scrap - scraps products of the transfer.
- Cancel transfer - cancels the transfer after you confirm.
Count the inventory by location
- On the home screen, tap Inventory count.
- Scan the barcode of a location. The location appears at the top and every following scan is counted there. Tap the cross next to it to clear the location: the list shows the counts of all locations again, and new scans are counted in your warehouse stock location.
- Scan each product (with its lot or serial number when tracked). Each scan adds one unit to the counted quantity of the line. A line shows the quantity on hand, who counted it and the difference.
- Tap a line to correct it with - and +, or tap Clear to remove the count.
- Tap Apply on a line to accept its counted quantity, or Apply all to accept every counted line.
Apply all is scoped to the location you scanned: it only applies the counted lines of that location (and the locations inside it). When more lines are counted than the screen shows, a note reminds you how many lines will be applied.
A Warehouse Operator sees only their own counts. A Warehouse Manager sees the counts of everybody.


Scrap products by scanning
- Open Inventory ‣ Operations ‣ Adjustments ‣ Scrap and click New, or tap Scrap on an open transfer.
- Scan the product barcode. The product is filled in and every further scan of the same product adds one to the quantity. Scan the barcode of a packaging to add its quantity.
- Scan the lot or serial number, the location or the package when the form asks for them.
- If nothing matches, a warning says the barcode was not found.
- Click Validate.

GS1 labels
When your company uses the GS1 barcode nomenclature, one label can carry the product, the lot or serial number, the quantity and more. The app reads the whole label in one scan:
- A label is all or nothing. If any part of the label is refused (an unknown product, an unknown location, a quantity in an unrelated unit, two quantities, a lot of another product), nothing at all is recorded and a message explains why.
- An aggregate label carrying several codes is read code by code under the same rule: if one code is refused, none is applied.
- Parts of a label the app does not use are ignored and listed in the confirmation message.
- For a weight label, the quantity is converted to the unit of measure of the product and rounded to the precision configured on your site for that unit, so the number of decimals you see on a weighed line is the one of that unit of measure.
Print the command sheet and the demo sheet
Barcode commands let you press a button by scanning a code instead of tapping.
- On the Barcode home screen, tap Print commands.
- Print the sheet and keep it near the work place. It is grouped by screen: the home screen (Operations, Inventory count), the transfer (Validate, Check availability, Return, Scrap, Cancel transfer, plus and minus, next and previous line), the inventory count (Apply, Apply all), dialogs (confirm or close) and the back-office forms (edit, save, discard).
- Scan a code on the screen it is printed for. Codes starting with OBT press the matching button of the current screen and codes starting with OCD run a general command, such as opening the Barcode app from anywhere. A command code is never taken as a product, lot, location or package.

On a demo database, tap Print demo sheet on the home screen. The sheet holds the barcodes of the demo receipt, the demo delivery, the demo count and the operation type that creates a new transfer, so you can try every step of this guide with a scanner or by typing the numbers.

Scan with the camera
- On a phone or tablet that has a camera, a camera button appears at the top right of every Barcode screen. Tap it and point the camera at a barcode; the result is handled exactly like a scan.
- On a device without a camera, or when the camera cannot be used (browsers usually require a secure HTTPS connection), the button is hidden. Type the number into the box Scan or type a barcode and tap the barcode button next to it.
A hardware scanner or a keyboard wedge scanner needs no setting: scanned codes arrive on the current screen automatically.
Warehouse Manager: sets barcodes and reviews every count
The Warehouse Manager does everything a Warehouse Operator does and, in addition, prepares the barcodes and reviews the counts.
Give barcodes to operation types
- Open Inventory ‣ Configuration ‣ Warehouse Management ‣ Operations Types and open a type.
- Fill in Barcode on the General tab. Give each operation type its own barcode: a barcode several operation types of the company share creates no transfer.
- Click Save.

Give barcodes to locations
- Open Inventory ‣ Configuration ‣ Warehouse Management ‣ Locations (shown when Storage Locations is turned on in the Inventory settings) and open a location.
- Fill in Barcode and click Save.

Edit the product barcodes in one list
- Open Inventory ‣ Configuration ‣ Products ‣ Product Barcodes.
- Click the Barcode cell of a product variant, type or scan the barcode and move to the next line. The change is saved as you go.

Review the counts
Open Inventory count in the Barcode app. As a Warehouse Manager you see every counted line, not only your own, and you can apply them with Apply or Apply all. Scan a location first to limit Apply all to that location.
Troubleshooting
- The Barcode app does not appear on the home menu.
- The user has no Inventory access right. Assign Inventory / User (see Setup).
- The screen says I need Inventory access.
- The same cause: ask your administrator for the Inventory / User access right.
- A scan says the barcode was not found.
- Check that the product, location, lot or operation type carries exactly that barcode, and that the barcode belongs to your company.
- A scan says the barcode is a barcode command.
- Codes starting with OBT or OCD are commands and are never read as data. Do not use such numbers as product or location barcodes.
- A label is refused and nothing was recorded.
- GS1 labels are all or nothing. Read the message: it names the part that was refused. Fix the product, location or unit of measure, then scan the label again.
- The lot number is refused on a receipt.
- The operation type does not create lots. Ask the Warehouse Manager to enable the creation of new lots on the operation type, or scan an existing lot.
- I cannot see the counts of my colleagues.
- A Warehouse Operator sees only their own counts. A Warehouse Manager sees all of them.
- The camera button is missing.
- The device has no camera, or the browser does not allow it on this connection. Type the number instead.
FAQ
- Can I use a handheld scanner instead of the camera?
- Yes. Any scanner that types the code like a keyboard works on every Barcode screen.
- Does Apply all apply every count in the warehouse?
- No. When you scanned a location it applies the counted lines of that location only.
- Can one label carry several codes?
- Yes, when your company uses GS1 aggregate labels: each code of the label is applied, or none.
- Which editions are supported?
- Community Edition. Not supported on Odoo Enterprise.
- Where can I find the manufacturing version?
- See viin_mrp_barcode for barcode scanning in manufacturing.
Demo video: Stock Barcode
This software and associated files (the "Software") may only be used (executed, modified, executed after modifications) if you have purchased a valid license from the authors, typically via Odoo Apps, or if you have received a written agreement from the authors of the Software (see the COPYRIGHT file).
You may develop Odoo modules that use the Software as a library (typically by depending on it, importing it and using its resources), but without copying any source code or material from the Software. You may distribute those modules under the license of your choice, provided that this license is compatible with the terms of the Odoo Proprietary License (For example: LGPL, MIT, or proprietary licenses similar to this one).
It is forbidden to publish, distribute, sublicense, or sell copies of the Software or modified copies of the Software.
The above copyright notice and this permission notice must be included in all copies or substantial portions of the Software.
THE SOFTWARE IS PROVIDED "AS IS", WITHOUT WARRANTY OF ANY KIND, EXPRESS OR IMPLIED, INCLUDING BUT NOT LIMITED TO THE WARRANTIES OF MERCHANTABILITY, FITNESS FOR A PARTICULAR PURPOSE AND NONINFRINGEMENT. IN NO EVENT SHALL THE AUTHORS OR COPYRIGHT HOLDERS BE LIABLE FOR ANY CLAIM, DAMAGES OR OTHER LIABILITY, WHETHER IN AN ACTION OF CONTRACT, TORT OR OTHERWISE, ARISING FROM, OUT OF OR IN CONNECTION WITH THE SOFTWARE OR THE USE OR OTHER DEALINGS IN THE SOFTWARE.